How to create a table in blogger
Sometimes
we need to present our content in the shape of tables because if we going to
share some specific projects with our site readers then we will easily add them
in tables and our site visitors are easily understand It but unfortunately
blogger don’t provide you any tool to create tables in blogger posts and if you
want to create it then you need to have deep knowledge in HTML, CSS and some other programming languages but
many of newbies don’t have knowledge about these languages, so we will need to
use any simple and easy method to create table in blogger posts.


pendrives
Also Read in tamil : பிளாக்கரில் டேபிள்பார்மெட் கொண்டு வருவது எப்படி?
Create Table in Blogger Posts Without Coding.
There is a lot of ways that we can use and create our table by
playing with different HTML and CSS codes but if we want to create table
without using any coding then we need any software that helps us to create
tables. You can use any software for creating table but we suggest you to use
MS office word because it’s very simple and easy to use and we can create every
type of table by using It. You can also change your table font and color styles
in MS word. Below we will going to share with you one method that how you can
use Microsoft word to creating table and after it add them in blogger
posts.
How to Create Table in MS Word?
This is
one of the simple and easy method to create table. You just need to download MS
Office from anywhere or if you already have then simply open it and follow our
steps. We will divide this tutorial in few steps that helps you to understand
this method easily and in below screenshots we will use Microsoft office 2007,
you can use any version of MS office for creating tables.
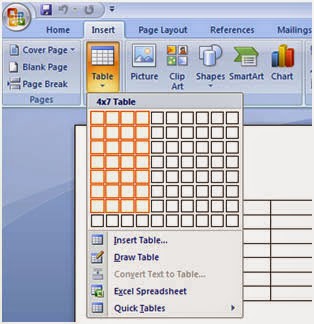
1.
First of all Open MS Word and got to Insert>> Table and
create table by choosing your desired rows and Columns.
2.
After it you need to write your desired content in Columns. You can also drag
and drop columns and rows by using your mouse cursor.
3. Now after
writing your content in table, we need to customize it
little bit and make it more shiny and attractive. You just need to click on “Design”
tab and you can see a list of some designs, just click any of them and apply on
your table. You can also use some other styles by clicking on next and previous
buttons.
How to Add Tables in Blogger Posts?
After
creating table we need to add it in blogger. There
is two ways that we can use to add tables in blogger posts and below we will
discuss both methods with fully detail.
Method#1: Adding Table By Simply Copy, Past.
This is
one of the best and easy way to adding table in blogger. Here you don’t need to
playing with any HTML or CSS coding, you just need to copy your table and paste
it in blogger post. If you don’t know a method then follow below steps.
1.
Simply Press (Ctrl+A) and select whole table and after it copy your table by
using (Ctrl+C).
2. Now Go to Blogger
Dashboard>> Create
New Post and Paste you table.
That’s
all, just write your desired content above or below table and publish it.
Method#2: Adding Table By Using HTML Coding.
If you
want to add MS word table by using HTML coding then below we will also
discussed each step of this method, just follow below steps and learn how you
can add table by using HTML coding.
1.
First of all Save your table by click on File>> Save as that
you see in top left corner.
2. Now saving
box will appear where you need to write your file name and save as type. Simply
write your desired file name with .html extension
and select “Web Page, Filtered” from save as type. After it select your
desired drive where you want to save this table and click on “Save”. (Tip:
Save your file on desktop to access it easily).
4.
After saving file simply right click on it and go to “Open With” and
select “Notepad”.
5. Now you can
see HTML Coding of your table, simply copy it and move for next steps.
6. Go
to Blogger Dashboard>> Create
New Post>> Move to HTML
tab.
7. Now Paste
your table coding in HTML tab and click on Preview or Publish post.

Comments
Post a Comment